나중에 프론트 쪽에서 할 상태관리를 위해 front폴더에 세팅을 해준다.
자세한 내용은 아래 링크에 접속하면 확인 가능하다.
https://typo.tistory.com/entry/Nextjs-next-redux-wrapper
Next.js | next-redux-wrapper
NextJS에서 상태를 관리하기 수월하게 해주는 redux를 TypeScript와 함께 사용해보자. 이 포스트는 counter에 대한 state를 다루는 포스트이다. 사전 준비 create-next-app으로 프로젝트를 생성한다. $ npx create.
typo.tistory.com
로그인에 관한 기본적인 세팅만 해주겠다.
1. 먼저 필요한 npm 모듈들을 설치하자.
$ npm i react-redux redux next-redux-wrapper redux-thunk @types/redux-promise @types/redux-logger
$ npm i redux-devtools-extension redux-logger --dev-save
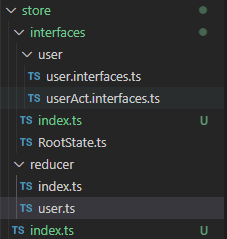
2. 루트 디렉토리에 store폴더를 생성하고 아래와 같이 구조를 만들어준다.
3. 그다음 아래 코드들을 입력해준다.
user.interfaces.ts
export interface UserState {
    userInfo : UserInfo;
    islogined : boolean;
    loginError : '';
    signupDone : boolean;
    signupError : '';
    idDuple : boolean;
    emailDuple : boolean;
    emailAuth : boolean;
    data : any;
}

export interface UserInfo {
    id : string;
    pw : string;
    email : string;
    address : string;
}
입력값으로 쓰일 User interface와 함수실행 후 반환값으로 받을 값들을 선언해준다.
마지막 data 속성은 차후에 payload로 데이터를 받기위한 저장공간이다.
UserState는 User를 포함한다.
userAct.interfaces.ts
export enum actionTypesUser {
    USER_INIT = "USER_INIT", // state 초기화
}

export type ActionsUser = UserInit

export interface UserInit {
    type : actionTypesUser.USER_INIT;
    data : any;
}
아직은 UserState를 초기화하는 actionType 밖에 없지만 차근차근 늘려나갈 것이다.
/store/interfaces/index.ts
export * from './user/user.interfaces'
export * from './user/userAct.interfaces'
4. user 인터페이스와 액트를 export한다.
/store/interfaces/RootState.ts
import { UserState } from './index'

export interface RootStateInterface {
    user : UserState;
}
5. UserState를 가져와 RootState에 넣어준다. ( 이곳은 모든 State를 포함합니다. )
/store/reducer/index.ts
import { combineReducers, Reducer, AnyAction } from "redux";
import { RootStateInterface } from "../interfaces/RootState";
import user from "./user_reducer";

const rootReducer: Reducer<
	RootStateInterface,
	AnyAction
> = combineReducers<RootStateInterface>({
	user,
});

export default rootReducer;
export type RootState = ReturnType<typeof rootReducer>;
RootState 폴더에 선언한 State들을 가져와서 Reducer와 엮어준다.
/store/reducer/user_reducer.ts
import { HYDRATE } from "next-redux-wrapper";
import { getFontDefinitionFromManifest } from "next/dist/server/font-utils";
import {
    UserState,
    UserInfo,
    actionTypesUser,
    ActionsUser
} from "../interfaces";

export const initialState : UserState = {
    userInfo : <UserInfo>{
        id : "",
        pw : "",
        email : "",
        address : ""
    },
    islogined : false,
    loginError : '',
    signupDone : false,
    signupError : '',
    idDuple : false,
    emailDuple : false,
    emailAuth : false,
    data : {}
}

interface HydratePayload {
    user : UserState
}

const user = (
    state = initialState,
    action : ActionsUser | { type : typeof HYDRATE; payload : HydratePayload }
) : UserState => {
    switch (action.type) {
        case HYDRATE:
            return { ...state, ...action.payload.user};
        case actionTypesUser.USER_INIT:
            return {
                ...state,
                userInfo : initialState.userInfo
            }
        default:
            return state
    }
}

export default user;user의 initialState를 정의해주고 dispatch가 실행됐을 때의 로직을 정의한다.
나중엔 action이 추가됨에 따라 reducer의 case도 늘어날 것이다.
/store/index.ts
import { createStore, applyMiddleware, compose } from "redux";
import { createWrapper } from "next-redux-wrapper";
import promiseMiddleware from 'redux-promise';
import ReduxThunk from 'redux-thunk';
import rootReducer from "./reducer";

const createStoreWithMiddleware = applyMiddleware(promiseMiddleware, ReduxThunk)(createStore)

const configureStore = () => {
	const store = createStoreWithMiddleware (rootReducer);
	return store;
};

const wrapper = createWrapper(configureStore, { debug: true });

export default wrapper;
store를 생성하고 _app.tsx에 쓰일 wrapper를 만들어준다.
/pages/_app.tsx
import { AppProps } from "next/app";
import { NextPage } from "next";
import wrapper from "../store"; // store.ts 파일

const MyApp: NextPage<AppProps> = ({ Component, pageProps }: AppProps) => {
	return (
		<>
			<Component {...pageProps} />
		</>
	);
};

export default wrapper.withRedux(MyApp);
_app.tsx 파일의 MyApp을 만들었던 wrapper로 감싸주면 store 설정이 끝난다.
마지막으로 tsconfig.json에 store부분을 추가해준다.
tsconfig.json
{
  "compilerOptions": {
    "target": "es5",
    "lib": ["dom", "dom.iterable", "esnext"],
    "allowJs": true,
    "skipLibCheck": true,
    "strict": true,
    "forceConsistentCasingInFileNames": true,
    "noEmit": true,
    "esModuleInterop": true,
    "module": "esnext",
    "moduleResolution": "node",
    "resolveJsonModule": true,
    "isolatedModules": true,
    "jsx": "preserve"
  },
  "include": ["next-env.d.ts", "**/*.ts", "**/*.tsx","store/**/*.ts"],
  "exclude": ["node_modules"]
}'Nest - Next' 카테고리의 다른 글
| Nest - Next | n2server | Signup | onChangeHandler (0) | 2021.10.19 |
|---|---|
| Nest - Next | n2server | Login, Signup Pages (0) | 2021.10.18 |
| Nest - Next | n2server | 시작하기 (0) | 2021.10.15 |
| Nest - Next | nest-next npm | 프론트엔드(NextJS) (0) | 2021.10.14 |
| Nest - Next | nest-next npm | 백엔드(NestJS) (0) | 2021.10.14 |