728x90
반응형
전체 코드 (index.ts)
import * as CryptoJS from "crypto-js"

class Block {
    public index: number;
    public hash: string;
    public previousHash: string;
    public data: string;
    public timestamp: number;

    static calculateBlockHash = (
        index: number,
        previousHash: string,
        timestamp: number,
        data: string
    ): string => CryptoJS.SHA256(index + previousHash + timestamp + data).toString();

    static validateStructure = (aBlock: Block): boolean =>
        typeof aBlock.index === "number" &&
        typeof aBlock.hash === "string" &&
        typeof aBlock.previousHash === "string" &&
        typeof aBlock.timestamp === "number" &&
        typeof aBlock.data === "string";

    constructor(
        index: number,
        hash: string,
        previousHash: string,
        data: string,
        timestamp: number
    ) {
        this.index = index;
        this.hash = hash;
        this.previousHash = previousHash;
        this.data = data;
        this.timestamp = timestamp;
    }
}

const TeepoBlock: Block = new Block(0, "2020202020202", "", "Hello", 123456);

let blockchain: Block[] = [TeepoBlock];

const getBlockchain = (): Block[] => blockchain;

const getLatestBlock = (): Block => blockchain[blockchain.length - 1];

const getNewTimeStamp = (): number => Math.round(new Date().getTime() / 1000);

const createNewblock = (data: string): Block => {
    const previousBlock: Block = getLatestBlock();
    const newIndex: number = previousBlock.index + 1;
    const newTimestamp: number = getNewTimeStamp();
    const newHash: string = Block.calculateBlockHash(
        newIndex,
        previousBlock.hash,
        newTimestamp,
        data
        );
    const newBlock: Block = new Block(
        newIndex,
        newHash,
        previousBlock.hash,
        data,
        newTimestamp
        );
    addBlock(newBlock);
    return newBlock
}

const getHashforBlock = (aBlock: Block): string =>
    Block.calculateBlockHash(
        aBlock.index,
        aBlock.previousHash,
        aBlock.timestamp,
        aBlock.data
    )

const isBlockValid = (
    candidateBlock: Block,
    previousBlock: Block
): boolean => {
    if (!Block.validateStructure(candidateBlock)) {
        return false;
    } else if (previousBlock.index + 1 !== candidateBlock.index) {
        return false;
    } else if (previousBlock.hash !== candidateBlock.previousHash) {
        return false;
    } else if (getHashforBlock(candidateBlock) !== candidateBlock.hash) {
        return false;
    } else {
        return true
    }

}

const addBlock = (candidateBlock: Block): void => {
    if (isBlockValid(candidateBlock, getLatestBlock())) {
        blockchain.push(candidateBlock)
    }
}

createNewblock("second Block");
createNewblock("third Block");
createNewblock("fourth Block");

console.log(blockchain)

export { };
addBlock을 createNewblock 부분에 추가해준다.
const createNewblock = (data: string): Block => {
    const previousBlock: Block = getLatestBlock();
    const newIndex: number = previousBlock.index + 1;
    const newTimestamp: number = getNewTimeStamp();
    const newHash: string = Block.calculateBlockHash(
        newIndex,
        previousBlock.hash,
        newTimestamp,
        data
        );
    const newBlock: Block = new Block(
        newIndex,
        newHash,
        previousBlock.hash,
        data,
        newTimestamp
        );
    addBlock(newBlock);
    return newBlock
}
함수를 실행해준다.
createNewblock("second Block");
createNewblock("third Block");
createNewblock("fourth Block");
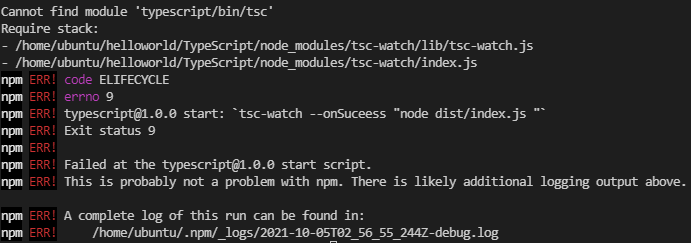
tsc-watch 로그를 보면..!

해시 링크드 리스트가 완성되었다!
728x90
반응형
'Typescript > 블록체인' 카테고리의 다른 글
| TypeScript | 블록체인 | 블록 검증하기 (0) | 2021.10.05 |
|---|---|
| TypeScript | 블록체인 | 블록 만들기(3) (0) | 2021.10.05 |
| TypeScript | 블록체인 | 블록 만들기(2) (0) | 2021.10.05 |
| TypeScript | 블록체인 | 블록 만들기(1) (0) | 2021.10.05 |