728x90
반응형


우리가 만약 getOne으로 데이터를 찾고자 하는데 실수로 입력을 했다고 치면 데이터가 없는지, 어떤 오류가 있는지 에러 핸들링을 해주어야 한다.


movies.service.ts

    getOne(id:string): Movie {
        
        const movie = this.movies.find(movie => movie.id === parseInt(id));
        if(!movie) {
            throw new NotFoundException(" ID가 존재하지 않습니다. ")
        }

        return movie;

    }


이런 식으로  getOne부분에 movie가 존재하지 않을 경우 error를 내보내도록 했다.

실제로 postman에서 request를 보내보면


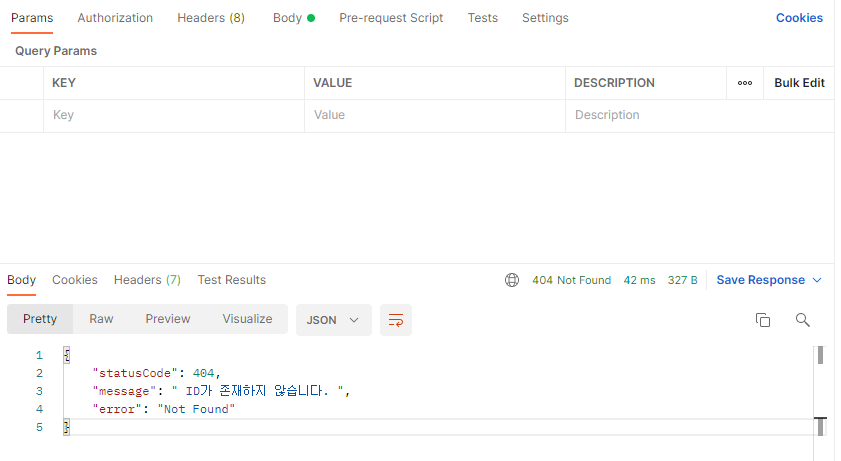
이런식으로 에러가 뜨는 것을 확인할 수 있다.


방금 만든 getOne() 함수로 우리가 데이터를 삭제할 때 해당 Id를 가지고 있는 Movie가 존재하는지 먼저 확인해 볼 수 있고 에러 처리를 할 수도 있다. 때문에 코드가 더 깔끔해진다.


    deleteOne(id:string) {
        this.getOne(id)
        this.movies = this.movies.filter(movie => movie.id !== parseInt(id))
    }


이번엔 update service를 만들어보자. 먼저, Controller 부분을 바꿔주자.

    @Patch('/:id')
    patch(@Param('id') movieId:string, @Body() updateData) {
        return this.moviesService.update(movieId,updateData)
    }


아직 Service부분에서 update 함수를 선언하지 않았기 때문에 당연히 에러가 뜬다. Service부분을 보자.


movies.service.ts

import { Injectable, NotFoundException } from '@nestjs/common';
import { NotFoundError } from 'rxjs';
import { Movie } from './entities/movie.entity';

@Injectable()
export class MoviesService {
    private movies: Movie[] = [];

    getAll(): Movie[] {
        return this.movies;
    }

    getOne(id:string): Movie {
        
        const movie = this.movies.find(movie => movie.id === parseInt(id));
        if(!movie) {
            throw new NotFoundException(" ID가 존재하지 않습니다. ")
        }

        return movie;

    } 

    deleteOne(id:string) {
        this.getOne(id)
        this.movies = this.movies.filter(movie => movie.id !== parseInt(id))
    }

    create(movieData) {
        this.movies.push({
            id: this.movies.length + 1,
            ...movieData
        })
        return true;
    }

    update(id: string, updateData) {
        const movie = this.getOne(id);
        this.deleteOne(id)
        this.movies.push({ ...movie, ...updateData})
    }

}


postman에서 실행해보면 정상작동하는것을 확인할 수 있다.

728x90
반응형
728x90
반응형

Service는 movie의 로직을 관리하는 역할을 맡을 것이다. Controller가 URL을 받아오면, 원하는 비즈니스 로직을

실행해준다. ( DB 작업 등이 이곳에서 이루어질 것이다. )


먼저 Controller를 만들었던것과 같이 Service를 만들어보자.

nest g s


그럼, 이름을 입력하라고 하는데, Controller와 같은 movies로 만들어보겠다.


이렇게 실행을 해주면!


위와 같이 자동으로 파일들이 생성되고, 루트 모듈에서 선언되는것을 확인 할 수 있다. ( 매우 편리한 기능! )

위에서 말했듯이 Service에선 주로 DB작업등과 같은 로직을 실행하는데, 이 강의에서는 실제DB를 다루는 것은 하진 않는다. 내 블로그에 있는 MongoDB 파트를 완벽히 이해하면 충분히 할 수 있을 것이다.


먼저, src 폴더 아래 다음과 같이 파일을 생성해준다.


그 다음 Movie class를 만들어준다.


movie.entity.ts

export class Movie {
    id: number;
    title: string;
    year: number;
    genres: string[];
}


이 class를 Service 파일에서 가져온다.


movie.service.ts

import { Injectable } from '@nestjs/common';
import { Movie } from './entities/movie.entity';

@Injectable()
export class MoviesService {
    private movies: Movie[] = [];
}


그 다음  Controller에서 쓸 함수를 정의한다. 이 때 이름은 중복되어도 상관이 없다.


movie.service.ts

import { Injectable } from '@nestjs/common';
import { Movie } from './entities/movie.entity';

@Injectable()
export class MoviesService {
    private movies: Movie[] = [];

    getAll(): Movie[] {
        return this.movies;
    }

    getOne(id:string): Movie {
        return this.movies.find(movie => movie.id === parseInt(id));
    } 
}


DB에 접근해서 모든 Movie를 조회하는 함수와 id를 통해 Movie 한개를 조회하는 함수를 작성했다.


이번엔 Controller에서 방금 만들었던 Service를 사용해보자. express.js처럼 수도으로 import하는 방법은 Nest.js에서 기본적으로 쓰는 방법이 아니다. 우리가 요청을 해야한다.


먼저 class에 구조체(constructor)를 가져오고, getAll() 부분과 getOne() 부분을 바꿔보겠다.


import { Controller, Get, Param, Post, Delete, Patch, Body, Query } from '@nestjs/common';
import { Movie } from './entities/movie.entity';
import { MoviesService } from './movies.service';

@Controller('movies')
export class MoviesController {
    constructor(private readonly moviesService: MoviesService) {}

    @Get()
    getAll(): Movie[] {
        return this.moviesService.getAll();
    }

    @Get('search') 
    search(@Query('year') searchingYear : string) {
        return `${searchingYear} 이라는 데이터를 찾을 것입니다.`
    }

    @Get('/:id')
    getOne(@Param('id') movieId: string){
        return this.moviesService.getOne(movieId)
    }

    @Post()
    create(@Body() movieData : Object) {
        return movieData;
    }

    @Delete('/:id')
    remove(@Param('id') movieId:string) {
        return `${movieId} id를 가진 movie를 삭제합니다.`;
    }

    @Patch('/:id')
    patch(@Param('id') movieId:string, @Body() updateData) {
        return {
            updatedMovie : movieId,
            ...updateData
        }
    }
}


이번엔 Service에서 delete함수와 create함수를 만들어보겠다.


movies.service.ts

import { Injectable } from '@nestjs/common';
import { Movie } from './entities/movie.entity';

@Injectable()
export class MoviesService {
    private movies: Movie[] = [];

    getAll(): Movie[] {
        return this.movies;
    }

    getOne(id:string): Movie {
        return this.movies.find(movie => movie.id === parseInt(id));
    } 

    deleteOne(id:string): boolean {
        this.movies.filter(movie => movie.id !== parseInt(id))
        return true;
    }

    create(movieData) {
        this.movies.push({
            id: this.movies.length + 1,
            ...movieData
        })
        return true;
    }
}


그리고 Controller 부분을 바꿔주자. search부분은 이미 설명을 했으니 삭제하겠다.


movies.controller.ts

import { Controller, Get, Param, Post, Delete, Patch, Body, Query } from '@nestjs/common';
import { Movie } from './entities/movie.entity';
import { MoviesService } from './movies.service';

@Controller('movies')
export class MoviesController {
    constructor(private readonly moviesService: MoviesService) {}

    @Get()
    getAll(): Movie[] {
        return this.moviesService.getAll();
    }

    @Get('/:id')
    getOne(@Param('id') movieId: string){
        return this.moviesService.getOne(movieId)
    }

    @Post()
    create(@Body() movieData : Object) {
        return this.moviesService.create(movieData);
    }

    @Delete('/:id')
    remove(@Param('id') movieId:string) {
        return this.moviesService.deleteOne(movieId);
    }

    @Patch('/:id')
    patch(@Param('id') movieId:string, @Body() updateData) {
        return {
            updatedMovie : movieId,
            ...updateData
        }
    }
}


동작은 postman에서 확인할 수 있다.


참조

https://nomadcoders.co/nestjs-fundamentals/lectures/1947


All Courses – 노마드 코더 Nomad Coders

초급부터 고급까지! 니꼬쌤과 함께 풀스택으로 성장하세요!

nomadcoders.co


728x90
반응형

'Back-End > Nest.js' 카테고리의 다른 글

Nest.js | REST API | DTOs and Validation(1)  (0) 2021.09.29
Nest.js | REST API | Movies Service(2)  (0) 2021.09.29
Nest.js | REST API | More Routes  (0) 2021.09.28
Nest.js | REST API | Movies Controller  (0) 2021.09.24
Nest.js | 개요 | Modules  (0) 2021.09.24
728x90
반응형

소개에서 다루었던 파일들을 다시 한번 보자.


main.ts

import { NestFactory } from '@nestjs/core';
import { AppModule } from './app.module';

async function bootstrap() {
  const app = await NestFactory.create(AppModule);
  await app.listen(3000);
}
bootstrap();

이곳에서 async await로 Appmodule을 앱으로 만들어 포트를 할당해준다.


app.modules.ts

import { Module } from '@nestjs/common';
import { AppController } from './app.controller';
import { AppService } from './app.service';

@Module({
  imports: [],
  controllers: [AppController],
  providers: [AppService],
})
export class AppModule {}

이곳에서 AppController와 AppService 파일들을 가져와 모듈을 만들어준다.


app.controller.ts

import { Controller, Get } from '@nestjs/common';
import { AppService } from './app.service';

@Controller()
export class AppController {
  constructor(private readonly appService: AppService) {}

  @Get()
  getHello(): string {
    return this.appService.getHello();
  }
}

이곳에서 AppService 파일을 import 하고 Controller를 만들어준다.


app.service.ts

import { Injectable } from '@nestjs/common';

@Injectable()
export class AppService {
  getHello(): string {
    return 'Hello World!';
  }
}

마지막으로 Service에선 Controller에서 return할 때 쓰인 getHello()함수를 명시하여 선언해준다.


이 때 Controller에서 바로 return 'Hello World'를 쓸 수도 있는데 왜 굳이 Service를 만들어주어야 하는지 의문점이 들 수 있다. 구조와 아키텍처에 관한 설명이 필요하다.


Controller는 그저 Url을 가져오는 역할이며, Service는 비즈니스 로직을 만드는 역할을 수행한다.

즉, Controller는 Url에 따른 함수를 가져오게 하고,  Service가 그 함수가 되는 것이다.


Url에 따라 분명 똑같은 비즈니스 로직이 실행되어야 할 때가 있다. 그럴 땐 Service에서 지정한 함수를 Controller에서 재사용이 가능하며, 유지 및 보수를 할 때 해당 로직에 문제가 생길 경우 수정 또한 쉽게 할 수 있다.

728x90
반응형

'Back-End > Nest.js' 카테고리의 다른 글

Nest.js | REST API | Movies Controller  (0) 2021.09.24
Nest.js | 개요 | Modules  (0) 2021.09.24
Nest.js | 개요 | Controller(2)  (0) 2021.09.24
Nest.js | 개요 | Controllers(1)  (0) 2021.09.24
Nest.js | 개요 | 첫 번째 단계  (0) 2021.09.24

+ Recent posts